

Labels: There are two slightly different forms of labels with comparative advantages as below:
Universal labels
Should be used for labels you use frequently and may want to change on multiple messages. This uses IMAP user flags to store the labels.
Webmail labels
Only use if you need more than 22 labels or IMAP user flags cannot be enabled. Since the label is stored as an additional header in the IMAP message, it requires webmail to modify and re-upload your email message to the server. So avoid using these on large messages.
Labels can be added and removed from messages as much as you like. However for both types of labels once the label has been created it cannot be deleted (for implementation reasons). You can however rename the display name or hide labels from display.
Yes, attachments are encrypted and may be downloaded from our secure site. The recipient can include an attachment in their replies as well.
Webmail Contacts
There are three ways to access webmail contacts:
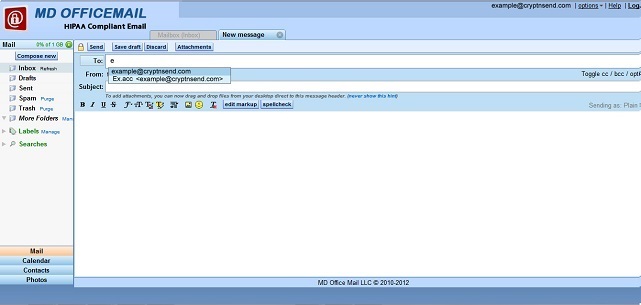
Auto-Completion
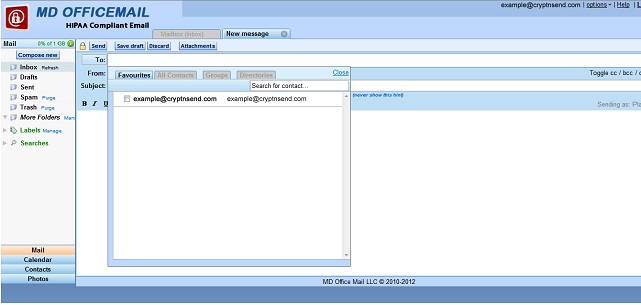
Picker
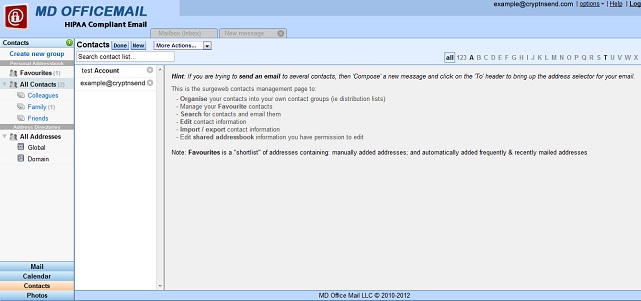
Management
As you use webmail, the addresses of people you email are automatically added to the contacts list. This makes auto-completion the easiest to use when composing a new message. The picker is more useful when adding multiple recipients and groups. The management page is primarily used to edit and organize your contact information.
Yes, attachments are encrypted and may be downloaded from our secure site. The recipient can include an attachment in their replies as well.
Auto-completion and Recipients Field

Type in a few characters in the Recipients (To) field, and it will auto-complete by creating a list of possible choices. You can then select an address by mouse or by keyboard.
Already added recipients can be removed by clicking the small x.
Contact Picker

The picker allows quick selection of multiple recipients to your email. Click the To: button, optionally filter by search criteria, and select the addresses you want to add. Once added, contacts can be removed from the recipient list by clicking its small x.
Four different sets of contacts are selectable:
The Contacts Management Page
The contacts management page enables more detailed contacts management functions including organizing contacts into groups (aka distribution lists), manually add or remove contact information, and edit contacts providing additional information.

There are three panes on the page:
A group is a grouping of contacts for easy management. A group can be used as a recipient, so it can be treated as a distribution list. To organize contacts into groups, just drag and drop a contact into the group of choice.

Some other important aspects of groups:
Searching / filtering the contacts
The center pane lists all the contacts in the currently selected group. These can be filtered using the Search field or the index tabs.

Editing Contact Information
A good selection of additional fields is available for adding detailed contact information. For most fields, more than one can be defined and the "type" of each field is selectable, e.g. home, work, etc. Display and editing contact information is done within the right pane.

Exporting Contacts
Contacts can be exported to standard vCard and CSV files compatible with Outlook and applications. Exporting to a text file listing only email address information is also available. To export the most detailed field information, please use the vCard format. You may indicate which contacts get exported based on group, current selection or all addresses. Export is available through the contact application "More action" pull-down menu.
Importing Contacts
Contacts can be imported into groups by directly typing in a list of addresses or through the use of standard vCard and CSV files generated from Outlook and other applications. Updating addresses from the old webmail interface is available as well. If you select a group to add your contacts, all get added to this group in addition to groups’ setup based on the source file. If an address already exists during an import, it is updated and not duplicated. Import is available through the contact application "More action" pull-down menu.
Shared Contacts & Address Directories
In addition to one's own personal contacts and groups, shared contacts and address books are available. These are listed in the lower half of the left pane on the contacts management page, labeled 'Address Directories'. Contacts within shared address books are indicated by a squared S icon. These might be read-only or editable within the contacts interface depending on permissions enabled for your account. The default Domain directory can be customized to list all mailboxes within your domain as read-only contacts, or it can be configured as a shared address book to do with as you like. Contact the server administrator for more information.
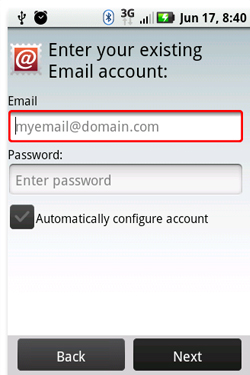
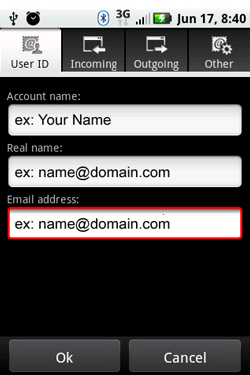
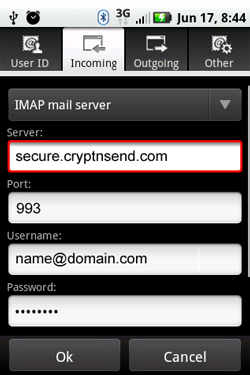
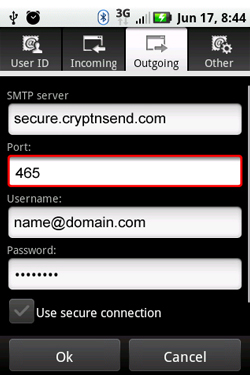
Please follow the instructions below given to configure your HTC mobile handset device:
*If you receive an error message "Authentication failed. Please verify your username/password." or "Cannot connect to the mail server to verify your account information. Your server is not responding", verify all settings with your mail provider, including settings for the incoming server and settings to access their outgoing server from other networks. Also see the Tips and Additional Information section.
Using MDofficeMail Server you can send and receive messages securly over iPhone as well. To configure MDofficeMail settings over your iPhone please follow the below given steps:
Note: Whenever "Save" is requested, please save. Ignore "failed' messages. You can continue to configure Setting an Secure email in iphone requires little patience.


Configure email settings for Android mobile devices For setting this up on an Android OS follow these steps:
*If you receive an error message "Authentication failed. Please verify your username/password." or "Cannot connect to the mail server to verify your account information. Your server is not responding", verify all settings with your mail provider, including settings for the incoming server and settings to access their outgoing server from other networks. Also see the Tips and Additional Information section.
